-
-
August 2, 2017 at 4:34 pm #141105
Jim McCallum
ParticipantI thought I had seen this somewhere but cannot find how to do it. If I take a picture out of the customers window and try to incorporate that picture into the design of their new kitchen window I cannot do this. Does anyone know how to do this and do you have to adjust the size of the photo you place in the 2020 Design? Thank you in advance.
-
August 2, 2017 at 5:04 pm #141117
 Nicky ClaridgeParticipant
Hi Jim 🙂
If you’re using V11.8, you need to import it like you would other textures but before you do you need to make sure that the original image file isn’t too big. I generally open the image with “Paint” and re-size to around 70 pdi.
Change the glass texture of the window to your re-sized image using the largest measurement (height or width) of the window as the size.
That’s how I do it anyway. There may well be a better way but this is how it works for me.
Good luck
Attachments:
-
August 2, 2017 at 8:47 pm #141144
 Mike LangensiepenPilot Pro
I’ve had issues with Nicky’s method where the image shows ‘half above/half below’ – I won’t go into details but it looks odd. Another method is to use the picture frame in Room_DEM or DEC and change the picture to match the external scene. I then use transparent glass in the window and stick the frame just outside.
It’s also nice to sometimes duplicate pictures they might have in their home.
Little touches like this tend to have the habit of blowing other kitchen companies out of the water (at least until they catch on and start doing the same).
I have 2 designers in one showroom who have just put in 50″ TVs to show the client their kitchen on a nice big screen. As well as showing the live render view, they will be able to show Panoramic renders and control the view via an iPad connected to an Apple TV box. I’ve done the same with an Android Tablet/Phone connected to a Kodi box. In each case, when the TV isn’t in use for a client., it will be showing photos and renders.
Our ultimate aim in that showroom is to have a relaxed viewing and discussion area with an even bigger display (possibly projector), coffee machine etc. If this leads to increased sales, we will roll out at the other showrooms.
-
August 2, 2017 at 9:01 pm #141145Mike LangensiepenPilot Pro
I forgot to mention but if you look (as I used to when I was in Sales) for ‘differentiators’ or ‘triggers’ to help the sale then even something as simple as changing a picture or TV display can help make the sale. Keeping a 2020 file with a pile of items (such as the link below) that are easily customisable and that you can then drop into a drawing really makes a difference. Thermomix owner? Drop a Sketchup imported thermomix onto the benchtop – they’ll love it.
https://panorama.2020.net/view/h3edjxmkb0mhof2phentpq/
-
August 3, 2017 at 1:02 pm #141276Participant
thank you for your input, when I take the pic and try to import it into the window I don’t get the prompt to import it into the window when I am in the window attributes and then variable then background image, all I get is the generic backgrounds, am I going to the wrong location to import?
-
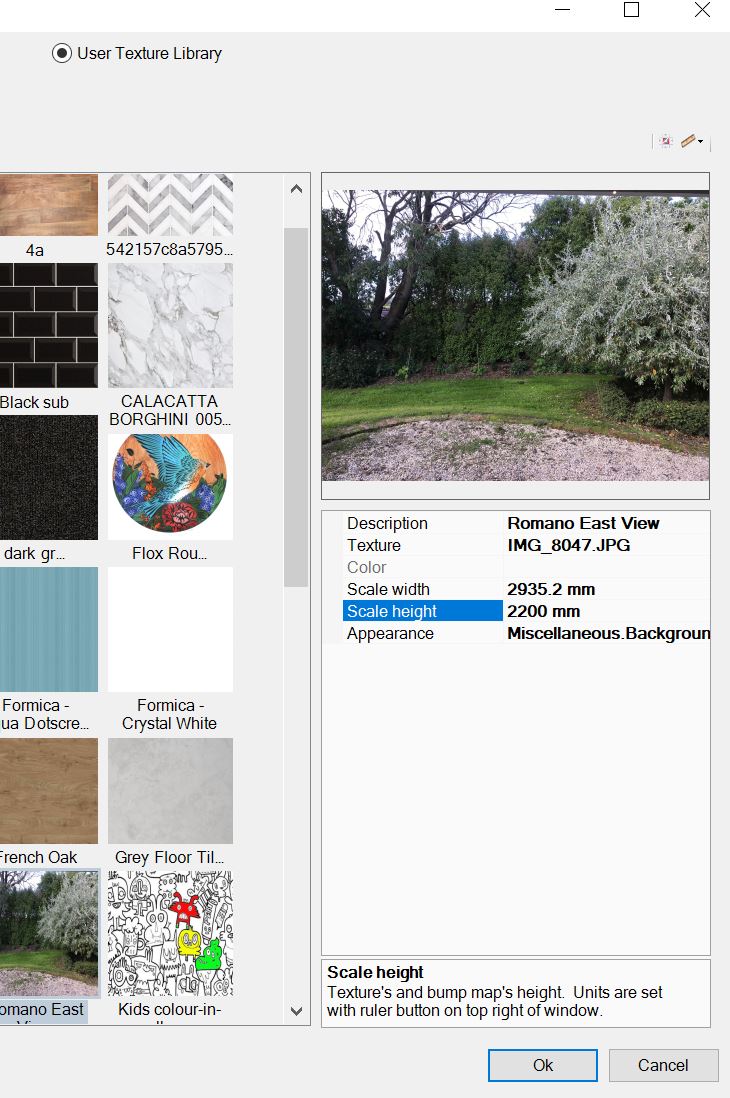
August 3, 2017 at 7:55 pm #141339Mike LangensiepenPilot Pro
When in the Window Attributes, go to the Glass Texture and click the existting background then in the Window that opens, pick User texture Library, click the 4th icon from left (Plus sign with a folder) and navigate to where your image is and import it. make sure it’s selected then click OK.
In the attached, you will see that there is an issue with the existing background and this is why I normally make the window transparent and put a picture outside the window with the scene I want.
I reported this issue several versions ago…
Attachments:
-

You must be logged in to reply to this topic.