-
-
January 10, 2020 at 9:52 am #264988
Ron Franks
ParticipantI need help again with angled ceilings. This one might be a little easier. I have a 10’x14′ rectangular bathroom in a log cabin. As you look at your screen the bottom wall and the left wall are exterior log walls. The bottom wall is 100″ tall. The top wall is 220″ tall. The left and right walls are angled accordingly. That’s the simple part.
My project is to add a tiled shower in the lower-left corner of the design. Because of the log walls, I have to build interior walls that float just inside of the exterior walls to isolate and let the log walls contract and expand without affecting my tiled walls.
So, when I try to put interior walls inside the original 10×14 layout, even though I dictate that the walls don’t connect to the ceiling, it still messes the angled ceiling up! I tried everything that I know in the design. I am using V12. I am attaching the file, maybe someone can help if they play with it. One of my biggest problems with the interior wall is when I specify the heights. The design builds a flat top wall; interior walls need to have an angled wall. In this design, I have a 12 pitch ceiling. Using a 4-1/2″ default wall, a wall that is parallel to the bottom, the bottom or inside part of the wall is fine but the top part or outside of the wall needs to be 4-1/2″ taller. It only lets me define the inside part of the wall even if I define my placement zone.
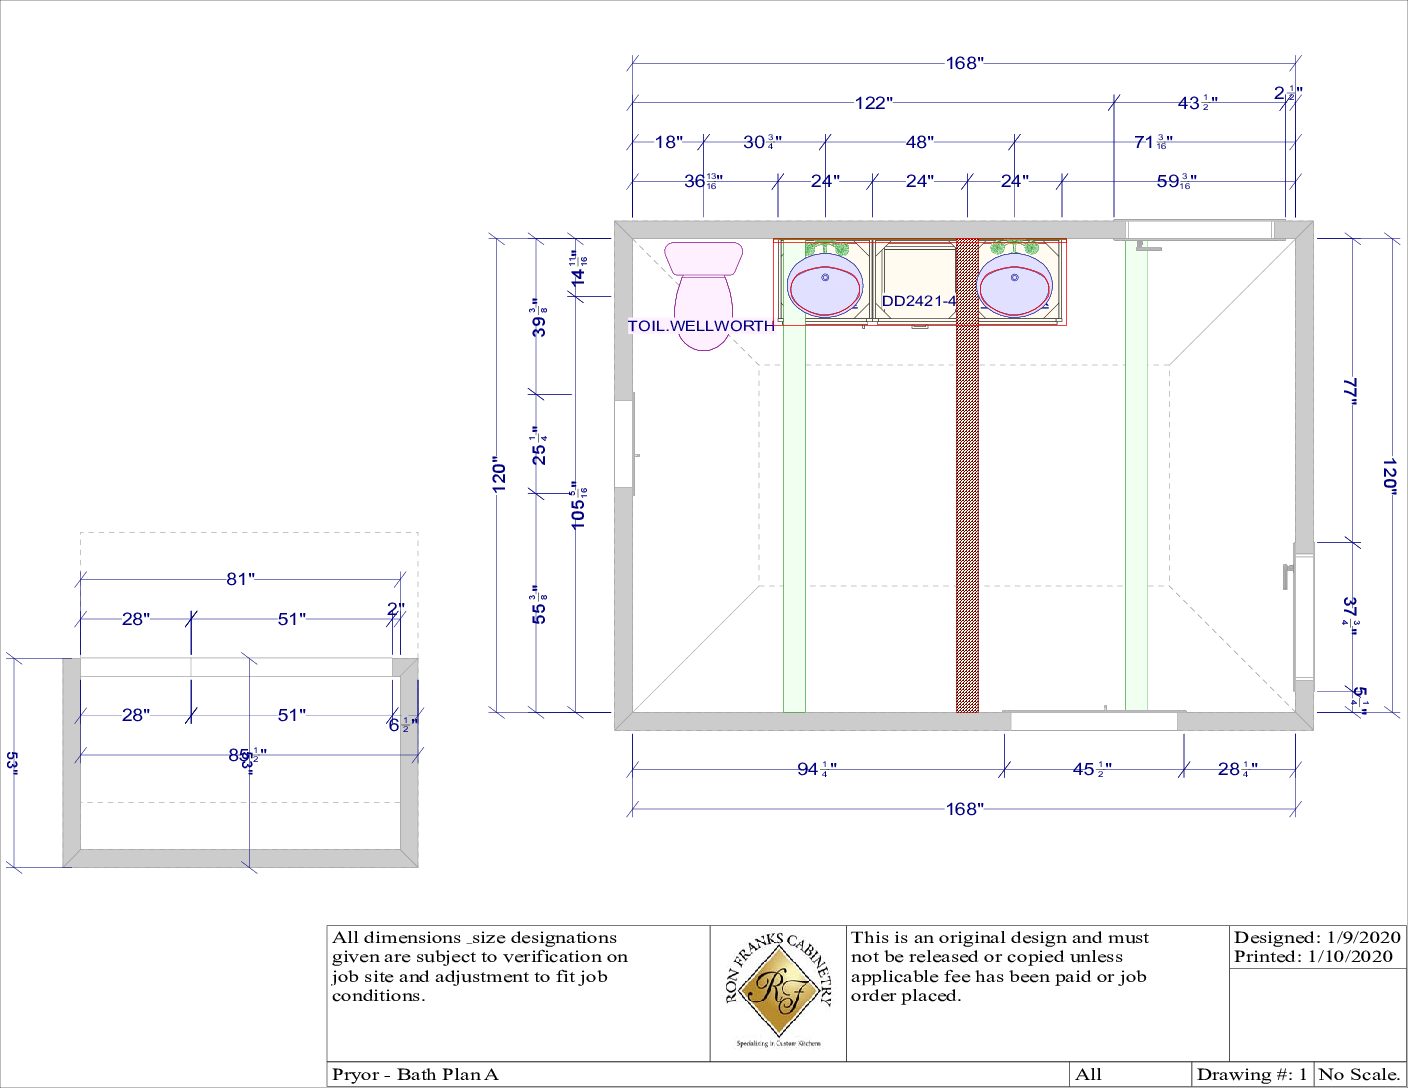
If you open up my design (attached), I have my shower built outside of the bathroom (just the walls and doorway and pass-through, no textures, fixtures, etc.), currently, I have the items in a group. I did this to drag and drop inside the design but then it automatically connects with the existing walls and that’s when everything gets screwed up. Is there a way to not let interior walls combine and attach to the exterior or perimeter walls?Sorry for the novel! LOL.
Any help would be greatly appreciated!
Ron -
January 10, 2020 at 10:16 am #264989Participant
Sorry, the file didn’t upload, I guess I can’t upload a design file for security reasons.
I’ll try and submit a few PDF’s to give you some visulation.
Thanks,
RonAttachments:
-
January 10, 2020 at 4:02 pm #265005Participant
Hello, I just wanted to update this topic.
I did finally figure a few things out. I finally determined how to not let the walls attach to each other, then, of course, this helps the ceiling out. It took a while but I’ll know for the next time.Attached is the finished design.
Attachments:
-
January 10, 2020 at 4:13 pm #265015Participant
Sorry, all the files didn’t load ….. it was that kind of day!
Here check this out.
Attachments:
-
January 10, 2020 at 5:46 pm #265030
Kristopher Papaleo
ParticipantThat’s really cool how you were able to get the structure into your room without it connecting to the surrounding walls. How were you able to get this done? I’d like to know your answer.
Kris
-
January 10, 2020 at 7:09 pm #265031Participant
Kris, it took some trial and errors but in the end it wasn’t really that difficult once I got to understand the program a little more. I’m so used to using architectural cad based software (Softplan) and sometimes I get commands mixed up.
To answer your question knowing there’s probably a simpler way (which I didn’t figure out yet) ….. I made my walls outside of the intended location to get exactly what I wanted first, then simply dragged it over and it snapped on the inside corner. Then I used ‘Edit Wall Shape (un-link the walls)’ and simply adjusted the walls leaving a 1/4″ gap between the walls. These inside walls I clicked on ‘no ceiling’ and luckily everything worked fine. It was also a challenge to get the textures correct. I struggled with that and I even had to call support because something wasn’t working the way it should (my doorway and pass-through window wasn’t rendering). All the support technician ended up doing was deleting the item and re-inserting the item into the wall. The only piece of advice I have is to wait on inserting decorative items until everything else is set (faucets, light fixtures, mirrors, etc.). The software constantly wants to render these items and it slows down progress significantly. Another way is maybe to shut of 3D objects in the Preferences. That might speed things up.Do you know of a better way?
Thanks,
Ron -
January 13, 2020 at 2:43 pm #265094Participant
Hi Ron,
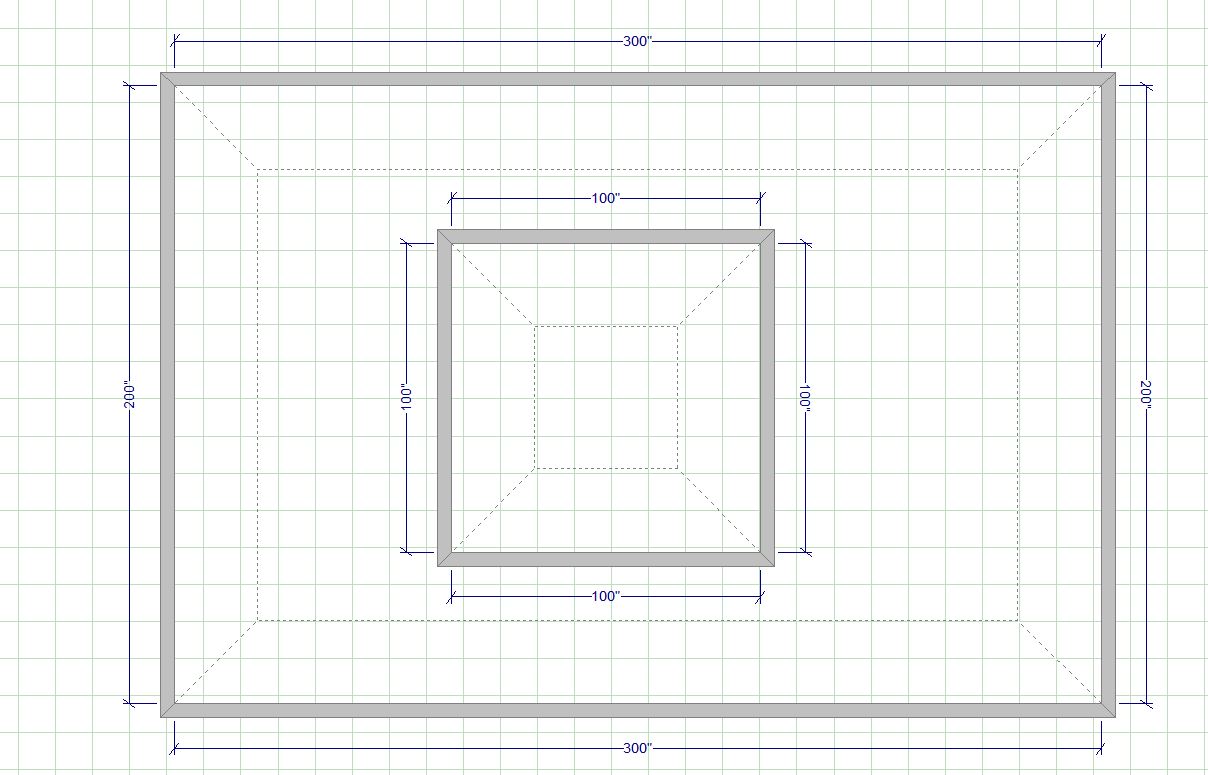
That is a good way of going about that but I’ve just tested out another way of doing it that might save some time!
Step 1 – Bring the small structure into the bigger one.
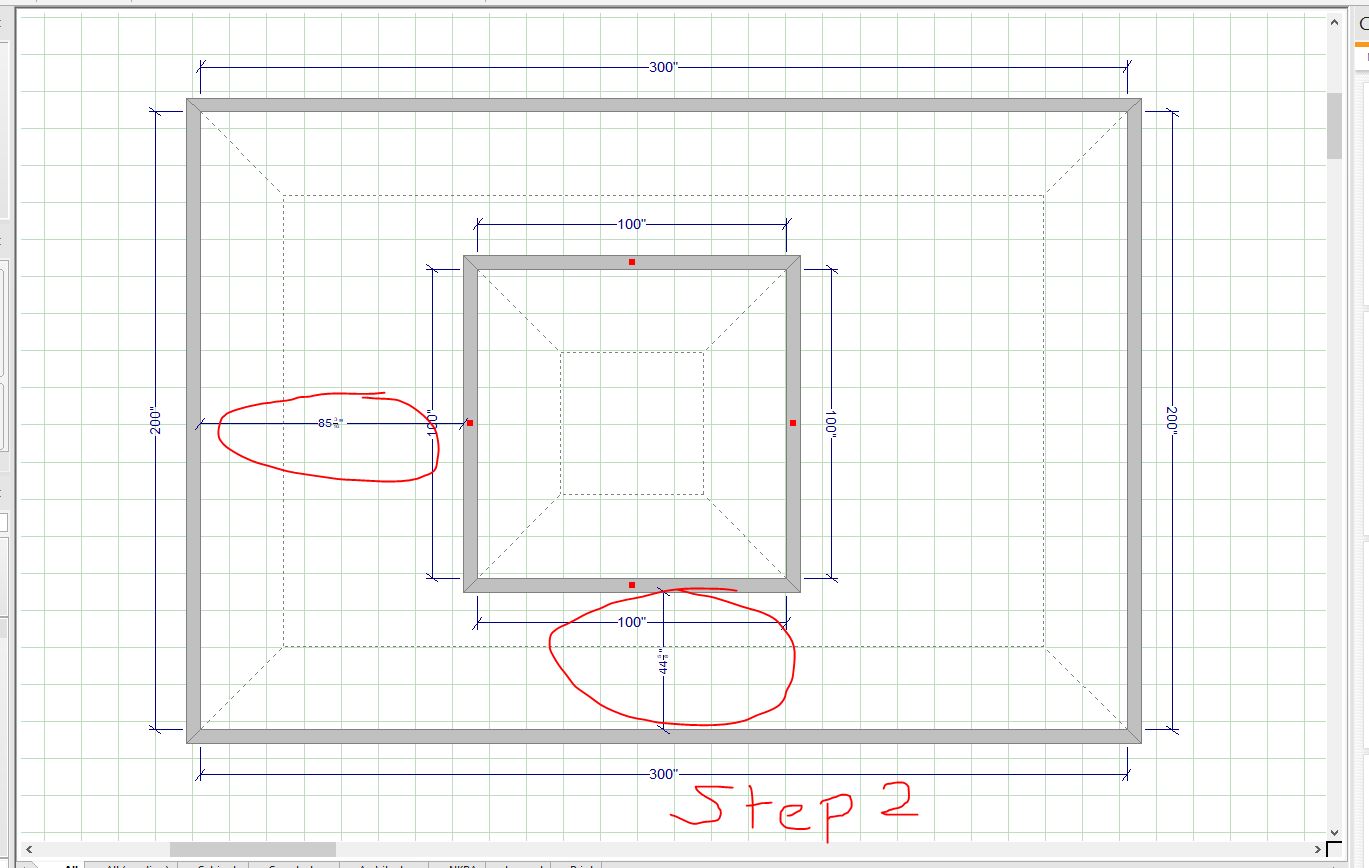
Step 2 – Use annotations to find the dimensions of how far the small structure is away from the larger one.
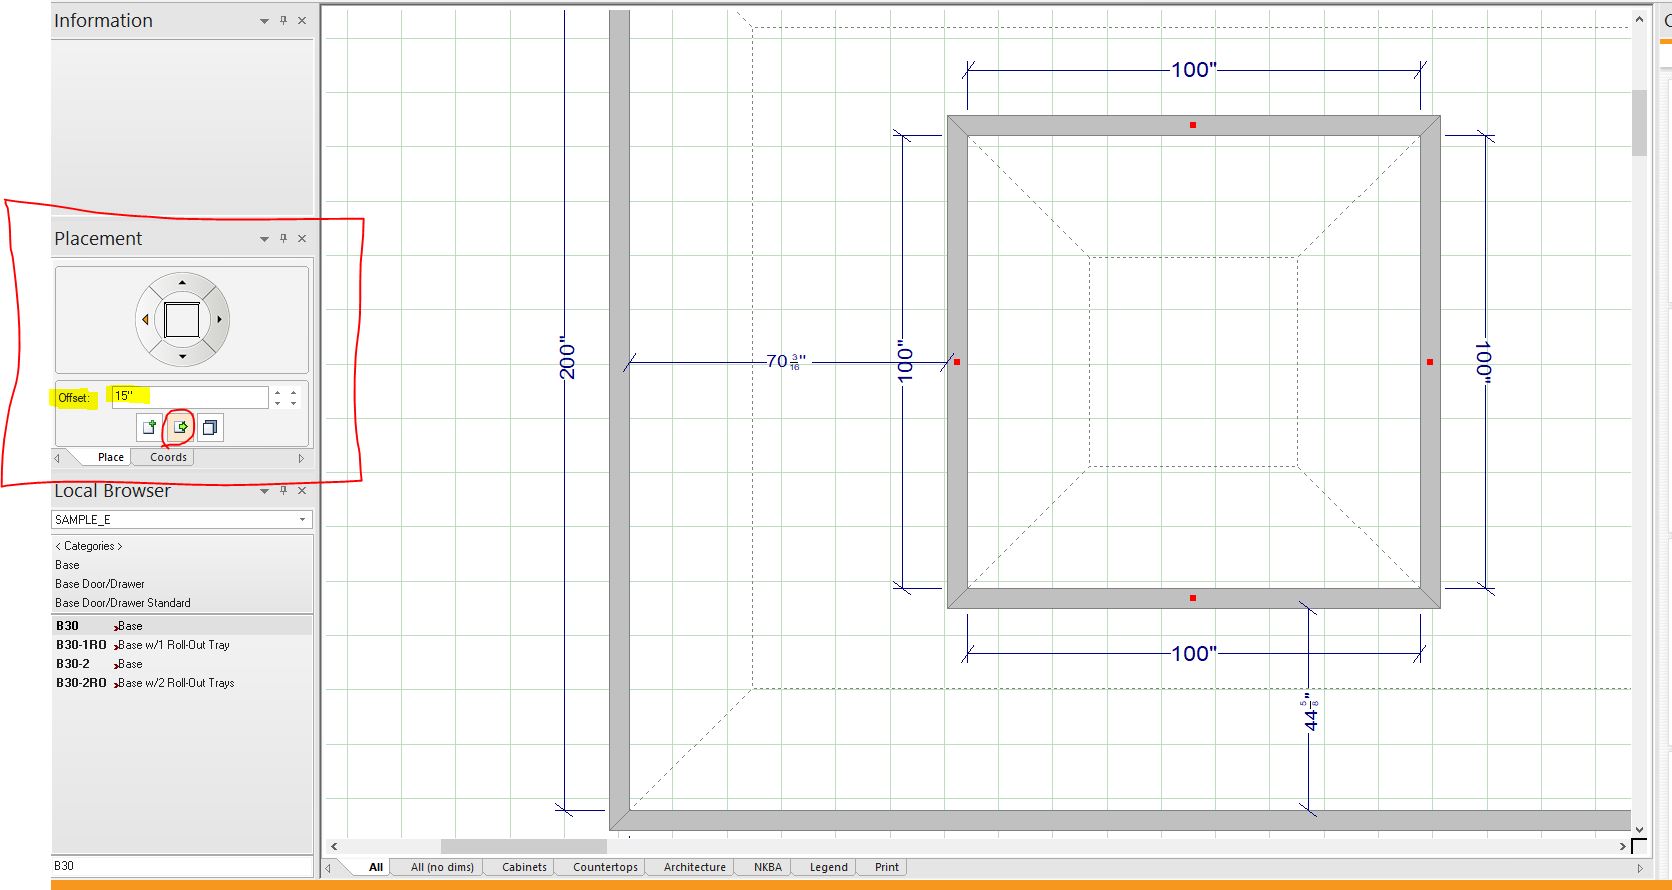
step 3 – Use the Placement wheel to then Move the smaller structure however far away. Make sure to select the “MOVE” box on the placement box and then you can type in an offset to move the smaller structure closer to the big one.
Please see the attached files for further clarification. Test out this method and let me know how you fare with it!
Kris
-


You must be logged in to reply to this topic.